Explore The Unknown
I've been working on and off on a dungeon crawler demo that I'd eventually like to turn into a little game.
I've been uploading videos on YouTube showing the different stages of development. The code is still very rough and ready (but I'm quite enjoying the freedom of hacking about at the moment.)
A Live Demo
On mobile you can use the on screen buttons to move forwards and backward, sidestep left and right and also turn 90 degrees left and right.
On desktop you can also use the keys WASD and Q and E to turn.
You may get a wall placed in front of you randomly, it doesn't matter, you can just walk through walls anyway as I've not done the collision logic yet.
You can also run the demo in a full webpage.
Starting From Scratch
I've built this demo using the HTML 2D Canvas API with pixel buffers that contain arrays of bytes that are interpreted as RGBA (red, green, blue, alpha) values.
I wanted to build the code from the ground up (as much as possible) having direct access to the pixels rather than using the Canvas drawing API (or WebGL) so that I could port to different languages and libraries (e.g. C and SDL.) Even though it's not the most optimal way of doing it, these types of games don't really need frequent updates, so I thought it would be okay.
Once I had the pixel buffers I then made some routines for setting and getting pixels, drawing lines and rectangles, and eventually drawing quads. A quad is shape with four points, like a Parallelogram or Trapezium (or a Trapezoid if you're American.)
The Quad Routine
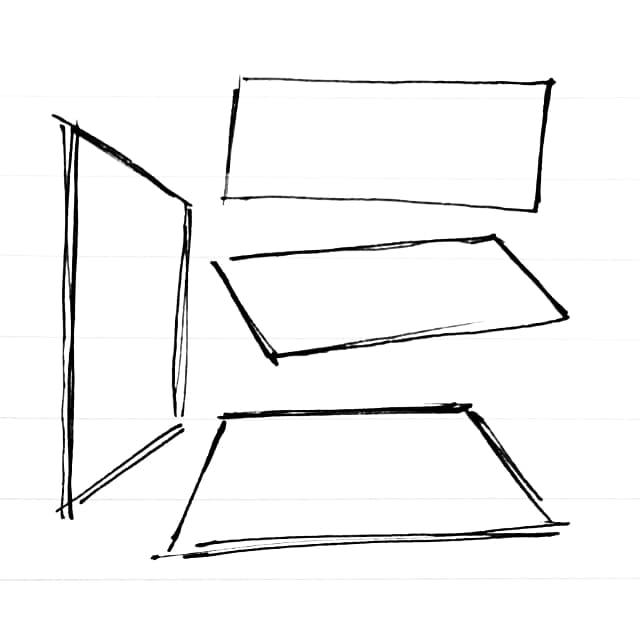
My first attempt at this was to use a textured triangle routine I'd previously made for a 3D demo, but that routine was very slow and looked glitchy because it didn't do perspective correction. I also wanted to keep the code simple without involving a lot of maths. So I took a different approach, taking inspiration from ray casters (that's a technique not a person) and games like Wolfenstein. So I started off looking at how to draw quads for walls.
The routine works by calculating the slope of the top and bottom edges and then looping left to right one pixel at a time, working out the top and bottom positons of vertical lines, where each line is a pixel wide. There's then a nested loop going top to bottom. Once all the vertical lines have been drawn you have a quad!
The next step is then to do texture mapping to draw the walls with different pixels instead of a single solid colour.
Textures
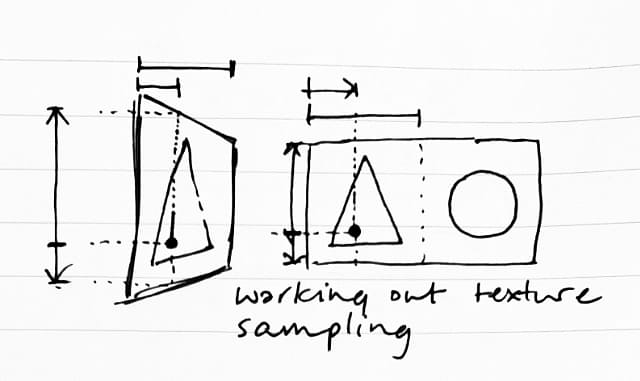
I already had pixel buffers with widths and heights and RGBA colour values (that could also be loaded from images.) So I added a way to get the colour from a pixel buffer at given a coordinate (also called sampling.)
I first used floating point (decimal) numbers (from zero to one) for the coordinates and converted them to actual pixel coordinates (with a bit of extra maths to round up and down) but it looked a bit glitchy in places, so I changed the coordinates to be pixel coordinates which seemed to work a bit better. The coordinate values are calculated in a single place given a tile index, so I can tweak the code without affecting other parts. It's still a bit glitchy though at the moment.
Doing Floors And Ceilings
The next step was to do a quad drawing routine for the floors and ceilings. My first thought was to duplicate the code and change the direction the loops worked in, but I realised the same routine could be used to draw quads on the opposing axis by swapping some of the corner points around and flipping some values around. I applied a similar idea to the texture coordinates and after a bit of trial and error got the quads drawing so I could do floors and ceilings. I still needed to create two wrapper functions to swap some parameters around before they called into the main drawing function, but I was pretty chuffed it was working.
Mixing Colours
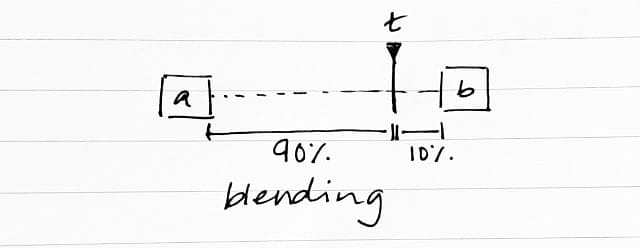
The pixel routines can also do colour blending using linear interpolation (which is basically mixing two RGBA colour values together using a sliding scale from zero to one, like a percentage of each colour.) You need to split up the colours into their component parts of red, green, blue and alpha and mix them separately before recombining them.
So if you wanted half and half you'd add 50/50 of each component together. Or 70/30, 80/20 etc. Instead of using percentages you use a floating point (decimal) number from zero to one.
result = (1 - t) * a + t * b
This is used to give an impression of depth when drawing quads, blocks further away are drawn darker than those in front.
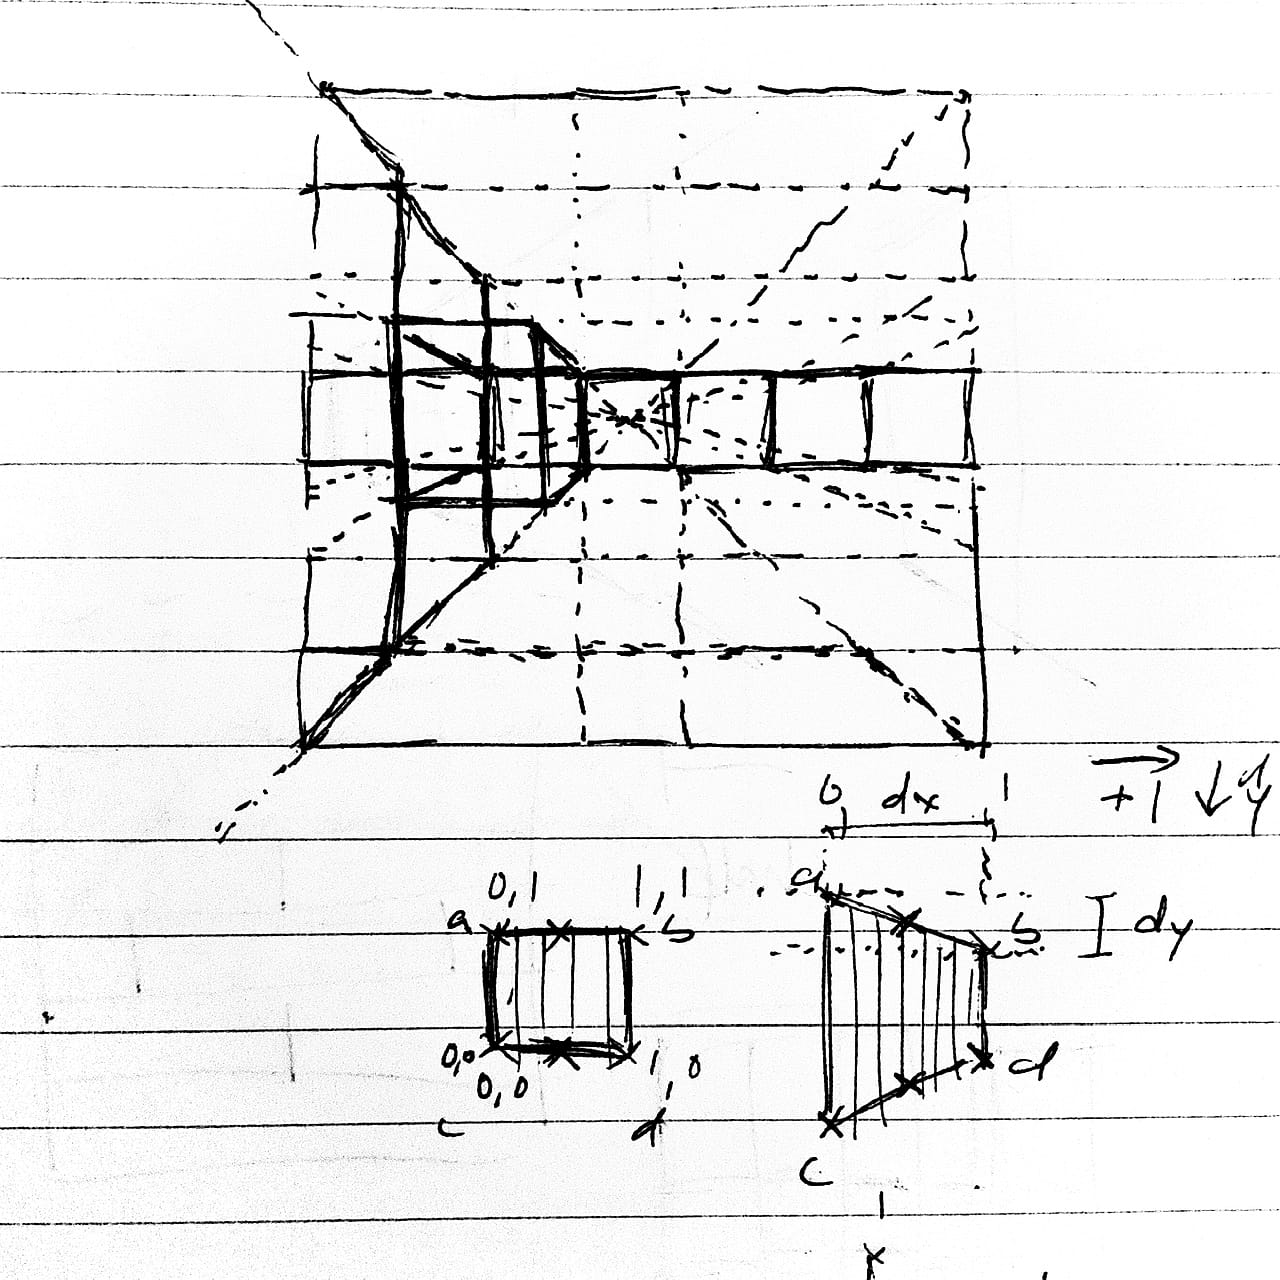
Projecting Coordinates
Now that the pixel drawing was ready I actually started drawing blocks. To do this I worked out walls at different scaling factors based on the rectangle of the screen, and used different scales that gave the impression of perspective. I then worked out how many wall panels were needed on a layer to fill the width of the screen. I needed to keep a wall panel in front of the player on each layer so if there was an even number of panels I added an extra one. I also ended up adding a couple more at the edges.
Even though I knew how many wall panels were visible on a certain layer, I stored the maximum number of wall panels used in the layer furthest away from the player to make the code easier to write later on when grouping points together.
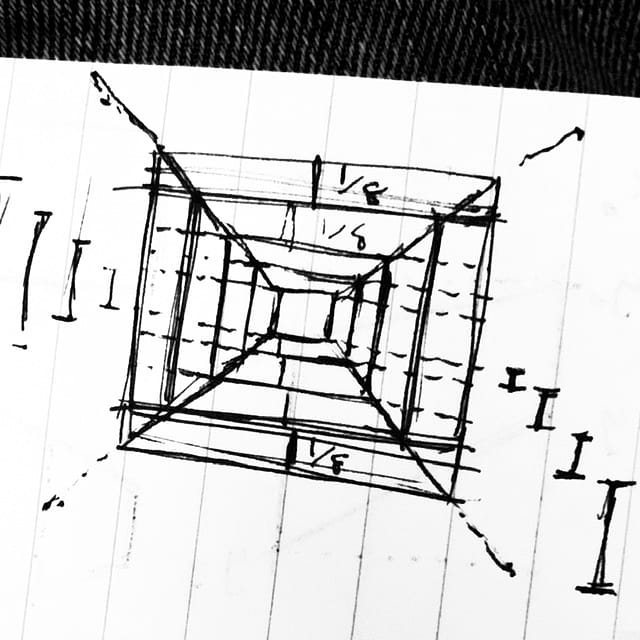
Once I'd centred the wall panels I was able to draw them on screen using a rectangle drawing routine by calculating loads of coordinates and drawing rectangles with them.
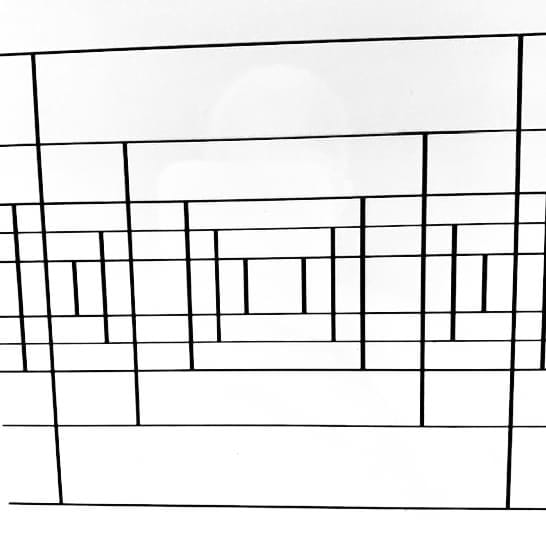
I later found out the way I'd placed walls next to one another caused glitches and gaps with my quad drawing so shoved them together so they overlapped, which looked better. You can see the walls are next to one another because the vertical edge lines are actually two adjacent edges.
If this was a proper 3D engine, this would be called the projection stage, getting all the coordinates projected in the correct positions.
Now that I had the coordinates, I could then refer to them in a data structure.
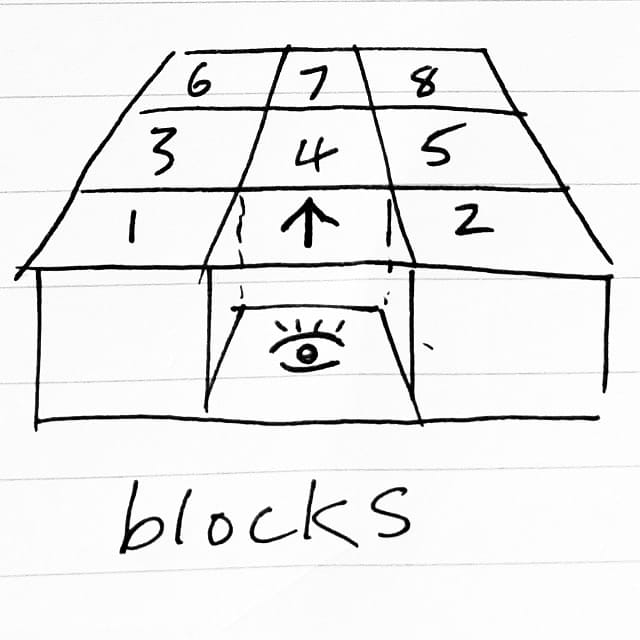
Blocks, Faces and Points
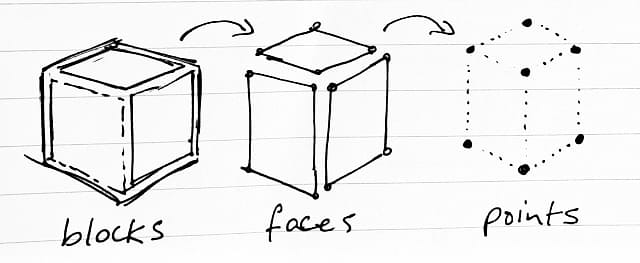
I used three data structures:
- Blocks refer to faces
- Faces refer to points (and colours and textures)
- Points hold the coordinates
The points were ordered a certain way in a large list, according to the layer that they were on, so I was able to make faces that referred to specific points by following an order and skipping around the list of points using offsets such as number of points per face and number of points per layer. I also ordered the points and faces in certain ways to suit the quad drawing routine, going left to right.
Now that I had some blocks I needed to draw their faces in the correct order.
Back-To-Front Ping Pong
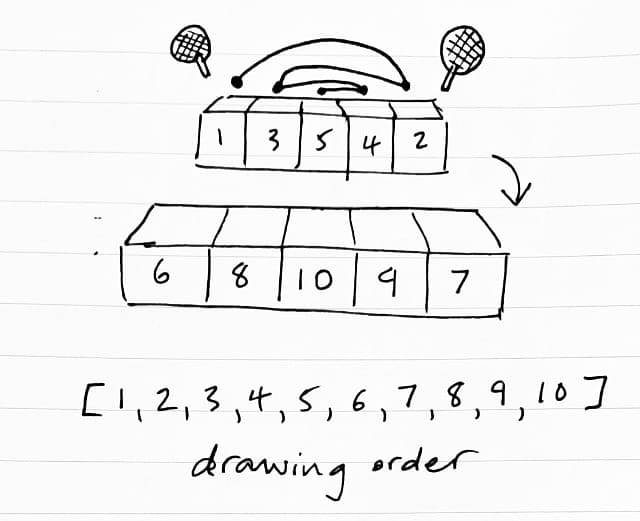
To do the drawing in the correct back-to-front order (which is different to how blocks are logically ordered front-to-back) I needed to make something that let me refer to blocks in a different order. This kind of thing is called an index (or an index array) and I did this indexing as just another list referencing the blocks. I needed to draw blocks in the order from furthest to closest, otherwise blocks in the distance would appear in front of blocks in the foreground. This type of back-to-front drawing is called the Painter's Algorithm.
To make this index I looped from back to front, also doing a ping pong movement getting closer to the centre block on each loop, going from left to right to left to right over and over again and finally the centre block. This was repeated for each layer of blocks getting closer to the foreground.
I still need to do an optimisation to include the visible blocks. I also still had some blocks and points allocated as it made some other code easier to implement, but I didn't worry about it as it's not a massive drain on resources.
Once I had this draw order index I could then draw the blocks and their faces. Before this though I needed to do a bit of face culling.
Culling Faces
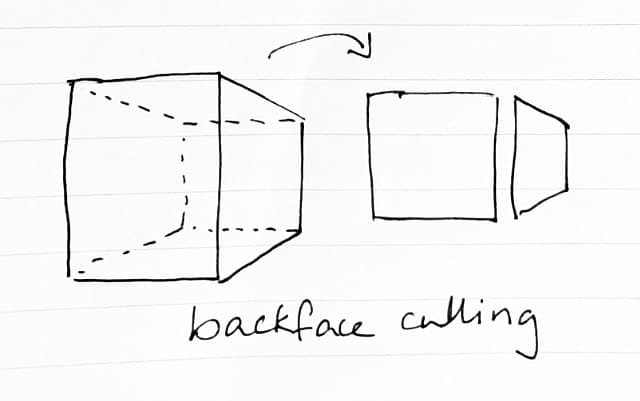
Culling just means removing. Normally in 3D graphics there's a step sometimes called backface culling or backface removal that uses the ordering of points in a triangle and the triangle's orientation in 3D space (with regards to the camera) to work out if a triangle is facing the camera. If it's not facing the camera there's no point wasting time and energy trying to draw it because you can't normally see inside solid objects (unless you're a visitor from the 4th dimension.) This same technique can also be applied to the blocks and faces in the demo.
Blocks to the left of centre only needed their front and right face, blocks to the right the opposite, and the centre block only needed a front face. The code for this was a lot simpler than doing 3D graphics (nothing like cross products or normals to worry about) because the blocks and faces were always oriented the same way for drawing.
So the next step was to work out if a block was on the left or the right or in the centre and then not bothering to make those faces.
That's basically the main behaviour of how things get drawn.
Now that there were blocks and faces being drawn, there was just one bit remaining, how to represent a level. To do that I used a separate data structure of a 2D grid of cells.
Grids And Cells
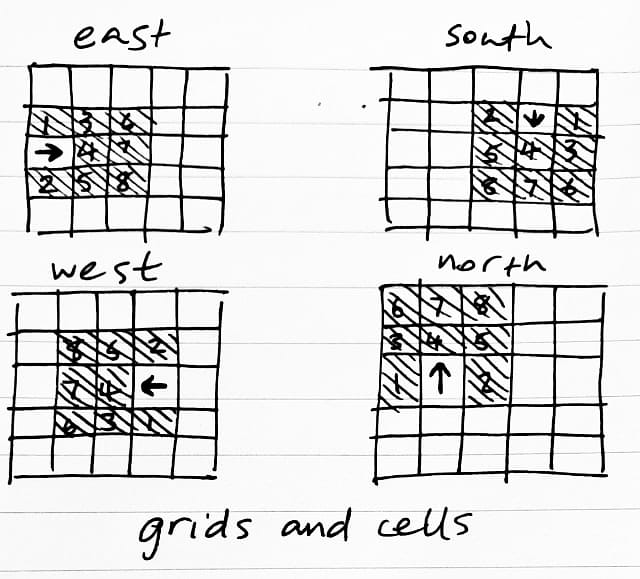
A game like this can actually be done as a 2D game but drawn in (fake) 3D. A level is a 2D grid of cells, viewed top-down like a map or a spreadsheet. Cells could be a single value representing a wall or an empty space, but most likely need to be a data structure to represent walls and other things like references to items or monsters.
When the player moves or changes orientation (a compass direction represented by a number) the player's position in the 2D grid and their orientation is used to sample a region of cells in a nested loop going through rows and columns of cells. During the loops, the values from the cells are then used to set values on the blocks and when all the cell values have all been copied into the blocks (and their faces), the blocks and their faces are then redrawn.
Next Steps
The next bit to look at is placing objects in empty blocks, to draw monsters and items. I've added some more points in the centre of the floor faces that will be used to work out the placement of graphics.
I've also added the ability to mirror a texture horizontally and vertically when drawing a quad and I intend to use this to draw monsters facing different directions without needing to make an extra flipped texture graphic. I'll need to work out how to draw monsters according to the player's orientation and the monster's orientation, but I think it'll be similar to how walls are drawn.
I also have a future plan to look at lighting effects using the colour mixing, animating textures and maybe also textures generated using code to do effects (a bit like a pixel shader.) But all that is way off and I'll need to tidy up the code first.
An Aside On Pixel Buffers
I've also previously made a proof of concept iOS app that bridged a raw byte array from Swift into JavaScriptCore (as an RGBA byte array) and I was able to write RGBA values from a headless JS runtime. The byte array was then used as a Metal texture to render the pixels. The app also ran a web server that was able to accept and hot-load new JS. There's a couple of YouTube videos I've posted that show this in action.
As my JS code is written from scratch and works with pixel buffers that are just wrappers around RGBA byte arrays this means in theory I could run this demo in an app without needing a web view.
If you're interested in these types of games, there's a great website devoted to them called Dungeon Crawlers.